How to Uninstall Chromium on Windows 10
Chromium is almost similar to Chrome, with a few additional features. The browser’s source code can be downloaded from the internet, modified, and improvised into a well-developed web browser. Following are some points you should know regarding Chromium.
How to Uninstall Chromium on Windows 10 Is Chromium a Virus? Determine Is Chromium a Virus? Method 1: Through Control Panel Method 2: Through Settings Method 3: Use Microsoft Program Install and Uninstall Troubleshooter How to Delete Chromium Files, Folders & Registry Keys Step I: Delete Chromium User Data Folders Step II: Delete Registry Entries Pro Tip: Run Malware Scan Afterwards What to do if Browser Settings have Changed after Installing Chromium? Option I: Clear Cache & Cookies Option II: Disable Extensions (If Applicable) Option III: Reset Chrome
The codebase of Chromium is widely used by many browsers like Edge, Opera, Samsung Internet, and other similar browsers that have active users and web developers. The primary goal of the Chromium browser is to provide source code for non–open-source browsers like Google. A clean Chromium pack will not start automatically in your PC, and it has only a limited software combo associated with it. But, hackers try to use this platform to intrude into your system. There are several symptoms when Chromium turns out to be malware. If you face them too, then you should uninstall them from your Windows 10 PC. First, you have to consider declaring is Chromium a virus and follow appropriate steps to uninstall it entirely from your PC.
Is Chromium a Virus?
Chromium is not a virus unless you install it from its official website. It is completely harmless, and you should not consider it a threat. Malware developers use Chromium as a medium to get into your PC with malware-infected versions of it. This tricks you into installing them on your computer. When you install the wrong or infected version of Chromium on your PC, your computer will be dumped with adware. You will be redirected to other irrelevant links to download any harmful software. This malware will continuously monitor your online behavior, and you will be suggested some infected software as ads that convince you to install it on your PC. If you have infected Chromium in your PC, you may face any one of the following symptoms.
You will suddenly have a Chromium browser installed on your PC if you have not installed it before. If you install them unintentionally, you will get infected Chromium installed in Windows 10 PC. Your default browser can be changed to Chromium from Crome without your knowledge and permission. When you try to uninstall Chromium on Windows 10 PC, you cannot find it in the Control panel or Settings. Your PC may run too slow or may be dumped with loads of startup programs consuming excessive CPU resources. You will always be annoyed with unwanted pop-ups and notifications triggering you to install additional software. These pop-ups and notifications cannot be blocked, which indicates the presence of infected Chromium malware. The search portal in the New tab will be changed. You may face problems in running installed applications and programs.
If you find any of these signs in your PC, you might probably have malware-infected Chromium. Ignoring these signs is not advisable since they cause huge problems. Some Chromium-based browsers infected with malware attacks are BoBrowser, Tortuga, eFast, BrowseAir, MyBrowser, Palikan, WebDiscover Browser, Olcinium, Chedot, Qword. In addition, there are a lot of Chromium clones that look similar with symbols, names, and features. You have to be very careful while dealing with Chromium-based browsers to keep your PC out of malware attacks.
Determine Is Chromium a Virus?
Another potential way to confirm the presence of Chromium malware is by identifying multiple Chromium processes in Task Manager.
- Open the Task Manager by pressing Ctrl + Shift + Esc keys together.
- In the Processes tab, check if there are two or more instances of Chromium.
3A. If you have many Chromium tasks running in the background, then you have to uninstall it from your PC. 3B. If only a few tasks are running in the background, it is not a threat. But if you want, you can uninstall them easily from your PC. This guide has compiled successful methods to uninstall Chromium from your Windows 10 PC. Also Read: Difference Between Google Chrome And Chromium? If you have confirmed that Chromium has been infected with malware, you have to uninstall it from your PC by following any of the below methods. In this section, we have compiled a list of methods to depict how to uninstall Chromium on Windows 10 PC. Follow them in the same order to fix Chromium won’t uninstall issue.
Method 1: Through Control Panel
The most typical way to uninstall Chromium from your PC is doing it from the Control Panel. If you can find Chromium in the Control Panel list, you can uninstall it from your PC by following the below-mentioned steps.
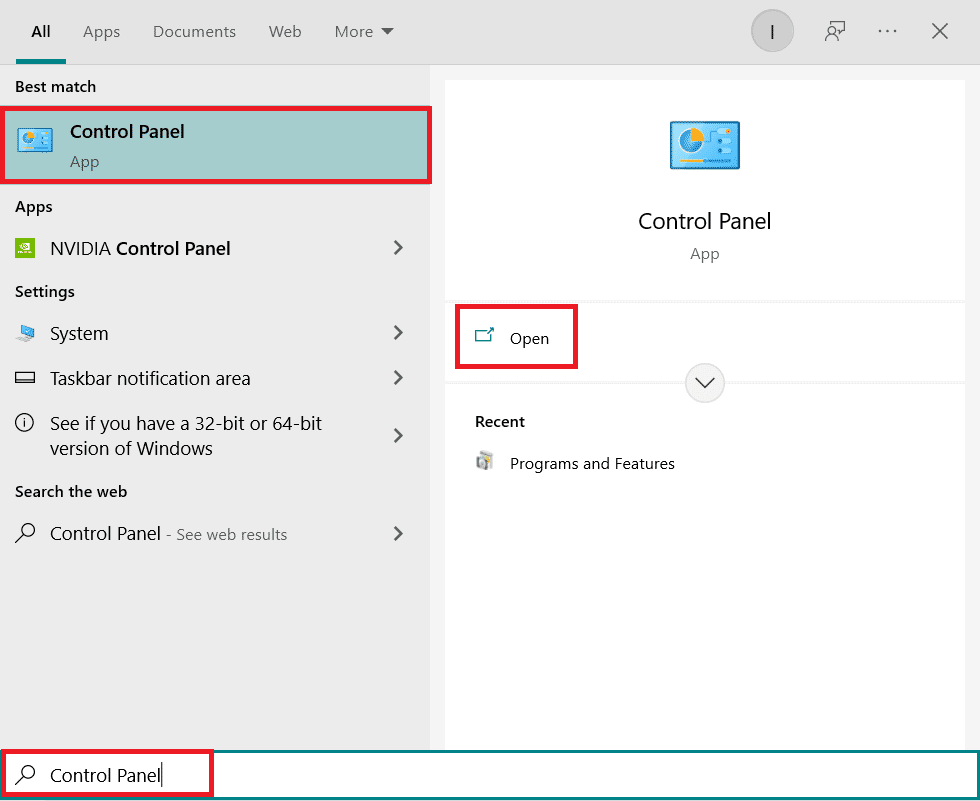
Press the Windows key. Type Control Panel and click on Open.
Set the View by as Category. Select Uninstall a program.
Search for Chromium in Programs and Features window.
Now, click on Chromium and select Uninstall option. Note: We have shown Chrome as an example below.
Now, confirm the prompt Are you sure want to uninstall Chromium? by clicking Yes.
Restart the PC. Check if you have fixed the Chromium won’t uninstall issue.
Method 2: Through Settings
If you cannot find Chromium in the Control Panel list, try uninstalling it by Settings. Here are a few instructions to uninstall the browser by Settings.
Press Windows + I keys simultaneously to open Settings in your system.
Click Apps.
Type and search Chromium in the list and select it. Note: We have shown Chrome as an example.
Finally, click on Uninstall.
Again, click Uninstall to confirm the pop-up.
If the programs have been deleted from the system, you can confirm by searching again. You will receive a message, We couldn’t find anything to show here. Double check your search criteria.
Also Read: 5 Ways To Remove Chromium Malware From Windows 10
Method 3: Use Microsoft Program Install and Uninstall Troubleshooter
If you want to permanently delete the Chromium browser or face issues during uninstallation, using Program Install and Uninstall troubleshooter software will help.
Download the Microsoft Program Install and Uninstall Troubleshooter from the official website.
Navigate to My downloads and double-click on the installed file.
Now, click on Next to install the downloaded file.
Here, select Uninstalling in the prompt.
5A. Next, select the program you want to uninstall and click Next. Follow the on-screen instructions to uninstall the software. 5B. If you do not see your program, select Not Listed and click Next.
- If you cannot find your program, enter the requested product code and click Next. Follow the on-screen instructions to uninstall the software. Note: You can find your product code in the property table of the MSI file.
How to Delete Chromium Files, Folders & Registry Keys
After uninstalling Chromium, make sure that all residual data corresponding to the app is also deleted as explained below.
Step I: Delete Chromium User Data Folders
Every application in your PC will store individual data in the form of cache, AppData, and Local AppData. If you face difficulties in uninstalling Chromium, give an attempt to clear all the AppData and Local AppData as instructed below and uninstall the software again by following the above three methods.
Click the Windows Search box. Type %appdata% and open it.
Select the Chromium folder and click Delete at the top, as shown.
Again, click the Windows Search box again. Type %LocalAppData% and open it.
Find the Chromium folder by using the search menu and delete it.
Also, ensure to clear the Recycle Bin to get rid of these files completely. Now, you have successfully deleted corrupt configuration files of Chromium from your PC. Also Read: How to Block and Unblock a Website on Google Chrome
Step II: Delete Registry Entries
There are chances that registry entries remain in the system even after deleting the files and uninstalling the Chromium. Follow the below steps to delete those entries. If you cannot find those strings, you can move on to the following method and fix Chromium won’t uninstall issue.
Press and hold Windows + R keys together to open the Run dialog box.
Now, type regedit in the Run dialog box and hit Enter.
Now, navigate to the following path
Delete the GoogleChromeAutoLaunch string. Note: If you cannot find this string, look and delete for a string with given value
Pro Tip: Run Malware Scan Afterwards
It is better to run an antivirus scan to remove the traces of Chromium even if you have deleted the Chromium folder due to the regenerative properties of malware. If you fail to remove them, the files may re-download from the last missing trace of malware. Hence, run a virus scan to remove any harmful programs from your PC potentially. Then, follow the below-mentioned steps to do so and fix Chromium won’t uninstall issue.
Hit Windows + I keys simultaneously to launch Settings.
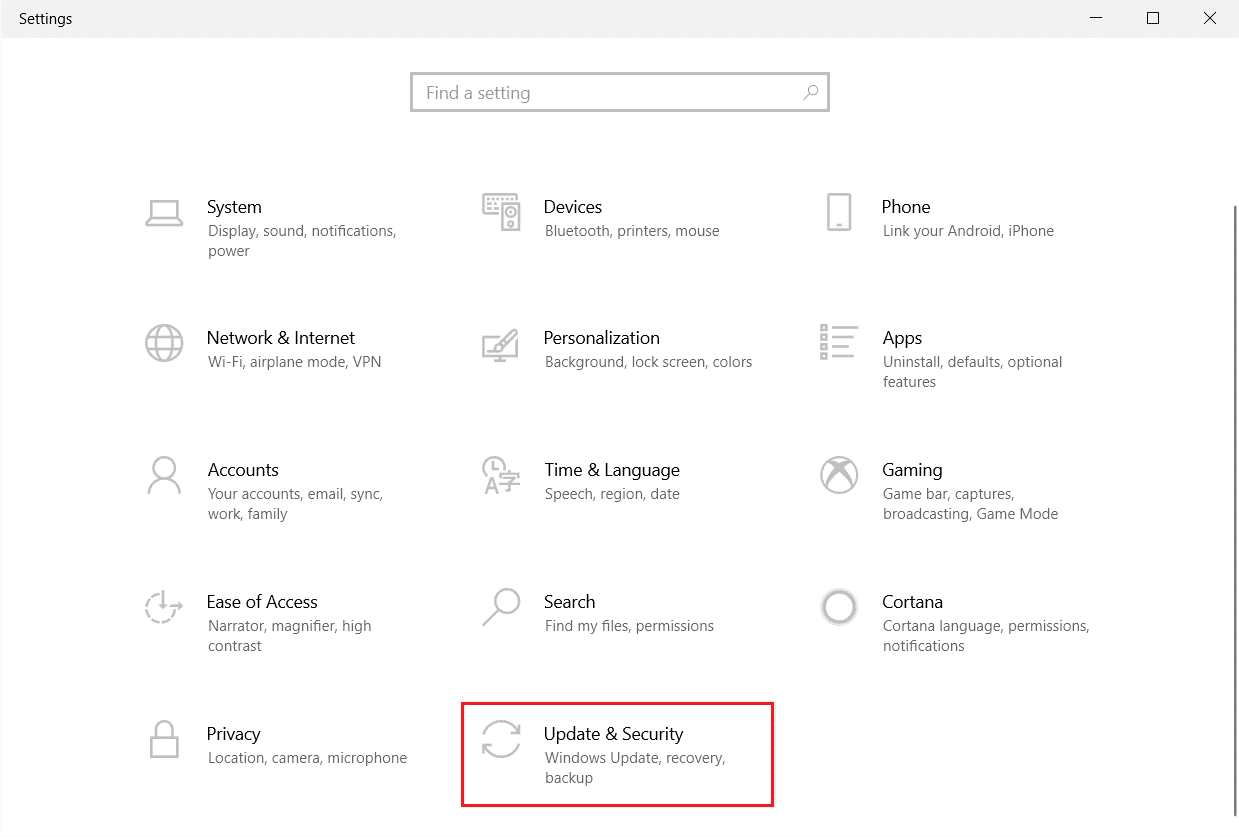
Here, click on Update & Security settings as shown.
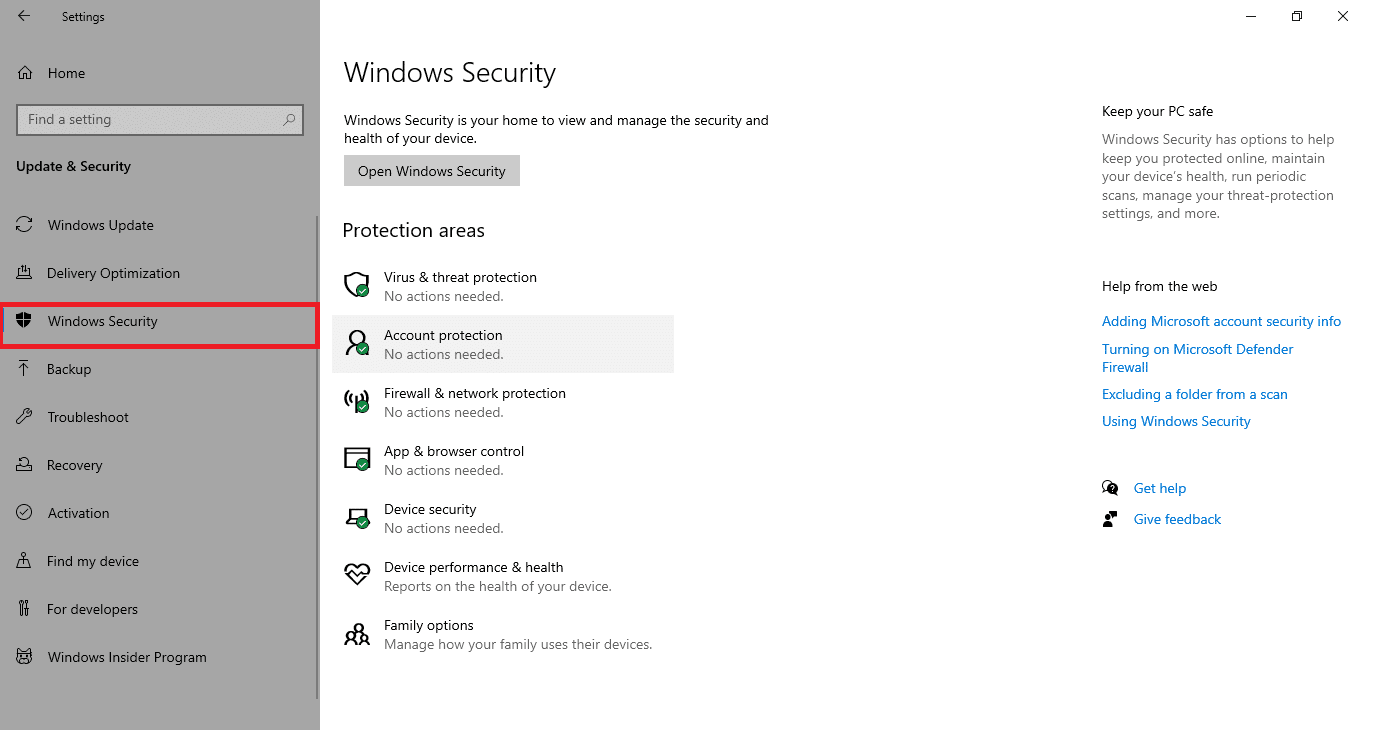
Go to Windows Security in the left pane.
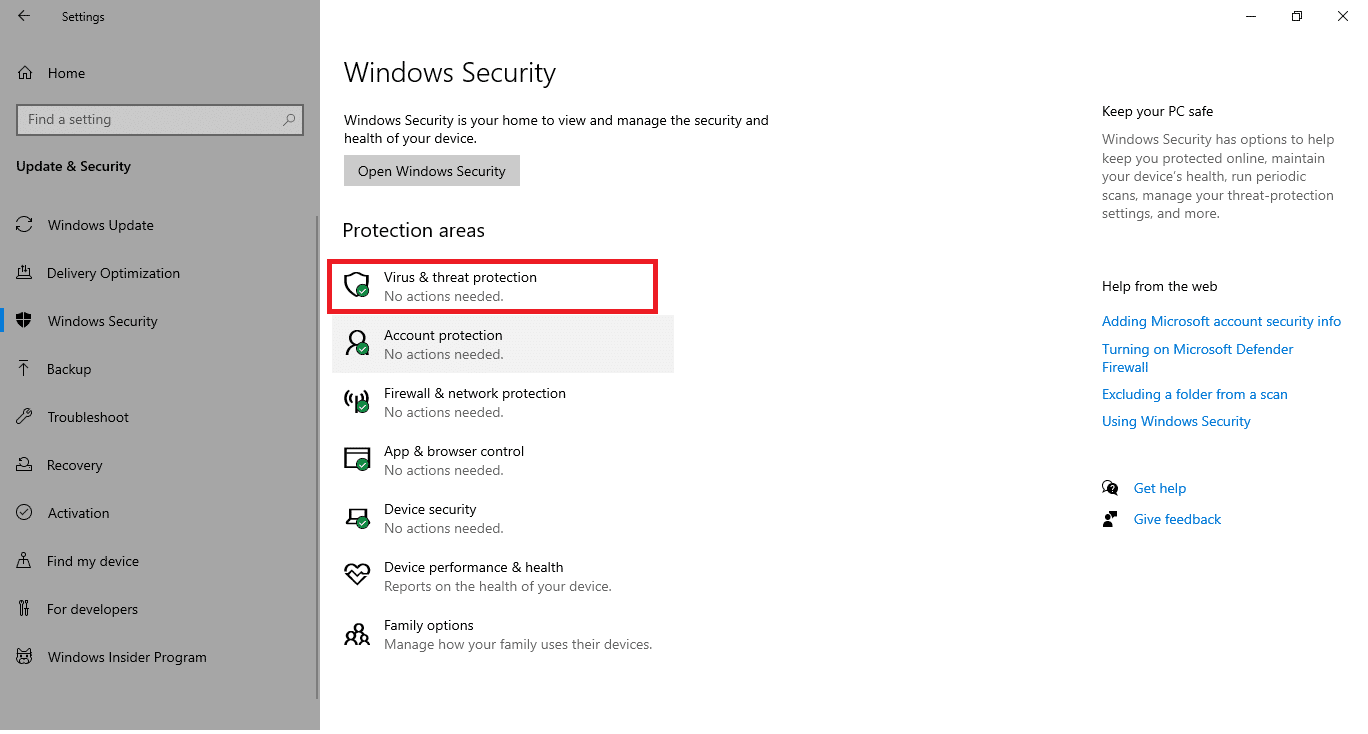
Click on the Virus & threat protection option in the right pane.
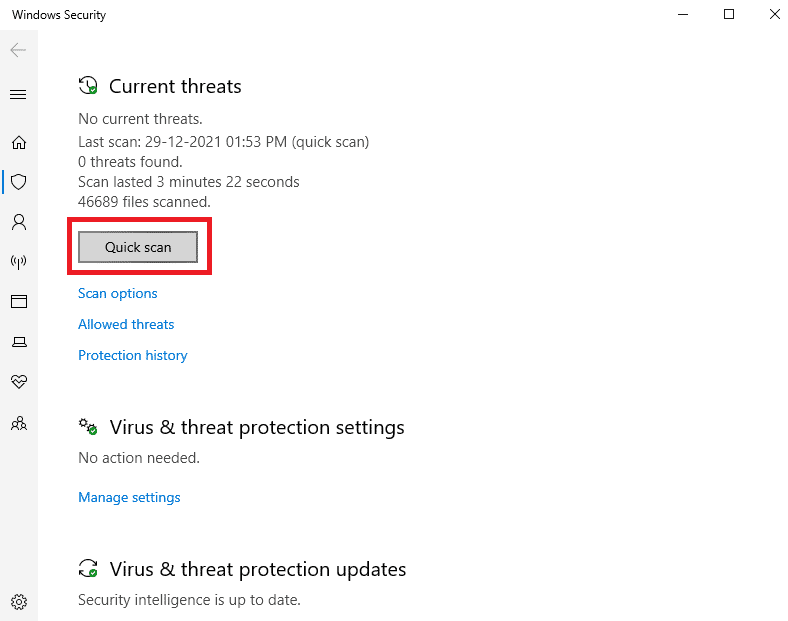
Click on the Quick Scan button to search for malware.
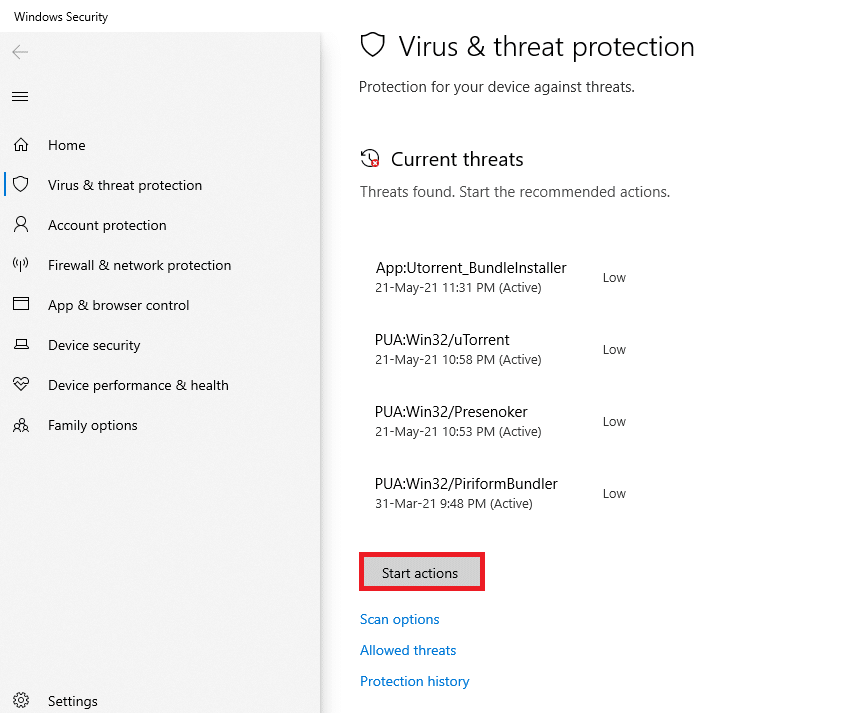
6A. Once the scan is done, all the threats will be displayed. Click on Start Actions under Current threats.
6B. If there is no threat in your device, the device will show the No current threats alert.
Now, check if you have fixed the chromium won’t uninstall issue. Also Read: How to Fix Chrome Ran Out of Memory
What to do if Browser Settings have Changed after Installing Chromium?
If you find that your default browser settings are changed after installing Chromium, you must follow the below-mentioned methods to bring the browsers back to their initial stage. Here, Google Chrome is taken as an example for demonstration.
Option I: Clear Cache & Cookies
Cache and Cookies improve your internet browsing experience. Cookies are the files that save browsing data when you visit a website. The cache acts as a temporary memory that keeps the web pages you visit and fastens your surfing experience during your next visit. Clearing them would help restore the browser to its default settings.
Press the Windows key, type Chrome and click on Open.
Then, click on the three-dotted icon > More tools > Clear browsing data… as illustrated below.
Check the following options.
Cookies and other site data Cached images and files
Now, choose the All time option for Time range.
Finally, click on Clear data.
Option II: Disable Extensions (If Applicable)
Follow the below-mentioned instructions to delete the extensions from Google Chrome.
Launch Chrome and type chrome://extensions in URL Bar. Hit Enter key to get the list of all installed extensions.
Switch Off the toggle for the extension (e.g. Grammarly for Chrome) to disable it.
3. Refresh your browser and see if the error is shown again or not. 4. Repeat the above steps to disable the extensions one by one to check if the error is fixed or not. Also Read: How to Enable Incognito Mode in Chrome
Option III: Reset Chrome
Resetting Chrome will restore the browser to its default settings. Follow the below-mentioned steps to reset Google Chrome.
Open Google Chrome and go to chrome://settings/reset
Click on the Restore settings to their original defaults option, shown highlighted.
Now, confirm your action by clicking on the Reset Settings button.
Recommended:
What are Valorant Laptop Requirements? Fix Windows Could Not Search for New Updates How to Fix Google Chrome 403 Error Fix Firefox Right Click Not Working
We hope that this guide was helpful and you have learned is Chromium a virus and how to uninstall Chromium on Windows 10. Let us know which method worked for you the best. Also, if you have any queries or suggestions regarding this article, then feel free to drop them in the comments section.


